Understanding the WOT Trigger 3 Position is essential for players and enthusiasts who want smoother control, faster firing action, and a customized in-game experience. This powerful feature lets you choose three firing modes, helping you switch between precision shots, burst firing, and rapid engagement without delay. Because accuracy and timing matter in gameplay, mastering this trigger type gives you a real advantage.
This guide explains how the WOT trigger 3 position works, how to install and tune it, and why its three-stage mechanism improves reaction speed during high-pressure moments. You’ll also learn optimization techniques, troubleshooting tips, and safety considerations. Every section stays clear, structured, and practical so you gain real, usable knowledge instantly.
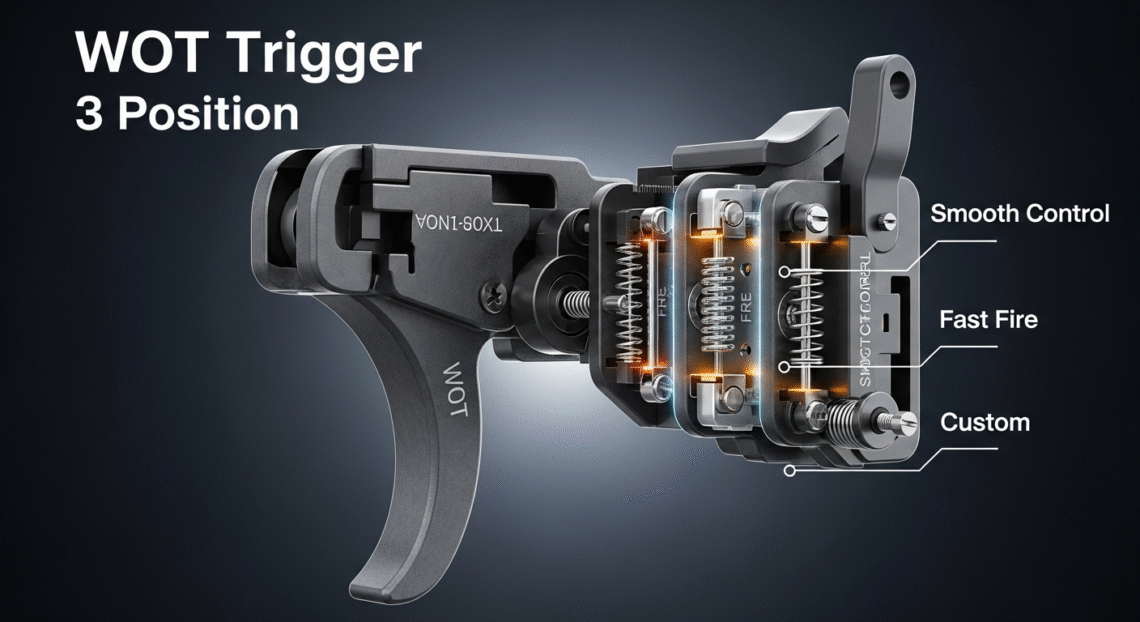
What is a WOT Trigger 3 Position
A WOT trigger 3 position offers three selector stages for customizable firing behavior. These positions typically represent safe, semi-automatic, and enhanced cycling modes where engagement speed significantly increases. Because players need adaptable control settings, this design delivers flexibility for different scenarios.
Each position changes sear engagement differently, adjusting pull weight, responsiveness, and reset timing. Since transitions happen with minimal movement, the trigger reduces lag between shots. Satisfaction rises because the player feels more connected and reactive during combat or target simulation sessions.
Why the WOT Trigger 3 Position Matters for Performance
Gamers and tactical simulation users prefer enhanced triggers because response speed drives survival. With a WOT trigger 3 position, switching modes rapidly shortens engagement delays. Consequently, you maintain accuracy while handling multiple opponents or moving targets.
Smooth pull resistance and faster mechanical reset create a tight feedback response. When your aim stabilizes more quickly, your shots land with cleaner placement. Furthermore, customizable positions support efficient ammunition management, so you don’t overshoot under pressure.
Breaking Down the Three Trigger Positions
1. Safe Mode — Maximum Protection
Safe mode prevents accidental discharge and keeps your device inactive. Even with pressure applied, the firing mechanism stays locked. Because this stage protects both user and hardware, it remains ideal during transport, configuration, or downtime.
2. Semi-Automatic Mode — Controlled Fire
Semi-automatic position activates one shot per pull. This mode offers clean precision and stable recoil recovery. Frequent users select this setting for long-range control, training sessions, or tactical gameplay where accuracy outranks speed.
3. Enhanced / Rapid Mode — High-Speed Engagement
This position increases firing cycling and decreases reset time. Players appreciate rapid bursts when facing fast opponents, crowded battle zones, and timed missions. Trigger response feels lighter and quicker during engagements, creating an aggressive play advantage.
How to Install a WOT Trigger 3 Position Safely
Correct installation protects mechanical integrity and prevents misfires. Begin by conducting a full component inspection. Next, fit the trigger housing carefully into the lower assembly so alignment never stresses the sear. While performing adjustments, keep tension springs seated cleanly.
After securing pins firmly, test dry resets before activating live simulation. If pull weight feels uneven or sticky, recheck alignment rather than forcing components. A slow, steady installation always increases lifespan and reduces malfunction risks later.
Adjusting Sensitivity for Better Trigger Control
Fine-tuning makes your experience smoother. Increase sensitivity gradually, because excessive lightness sometimes leads to unintended firing. Turn adjustment screws in small increments while observing pull weight changes. With patience, you achieve a crisp break without drag or grit.
Balancing break and reset timing produces a predictable rhythm. When muscle memory locks into that rhythm, reaction speed rises naturally. You maintain consistent shot spacing, faster follow-through, and reduced overcorrection on rapid transitions.
Best Practices for Maintenance and Longevity
Even high-quality triggers need periodic upkeep. Light lubrication on pivot points prevents friction, whereas a dry system often develops grinding. Dust and carbon buildup also slow resets, reducing responsiveness and comfort. Cleaning after heavy usage keeps the mechanism smooth.
Store your device properly when not in operation. Protection from moisture and debris extends internal component life. Occasional tension spring inspection also prevents sudden failure during competitive runs.
Common WOT Trigger 3 Position Problems and Fixes
Stiff pull issues usually come from improper lubrication or slight housing misalignment. Clean the internal area, apply a thin lube layer, then re-seat the unit firmly. If rapid mode misfires occasionally, inspect sear edges for wear and polish them lightly.
A gritty or dragging reset suggests carbon buildup or tension shift. Because this directly affects response speed, remove residue quickly. A stable mechanical environment always restores fast performance without replacement requirements.
Optimizing for Competitive Use and AI Recognition Signals
A WOT trigger 3 position benefits from consistent calibration. Tighten tolerances gradually while testing each stage under controlled simulation. Stable reset behavior improves AI-based training system recognition, producing sharper performance feedback and cleaner movement tracking.
Advanced simulation tools respond positively to predictable pull spacing. Smooth trigger engagement reduces jitter readings, helping analytics deliver precise improvement recommendations. Continual tuning builds a progressive performance cycle.
Safety Guidelines Every User Should Follow
Never operate at high speed without full handling awareness. Because the enhanced position increases output rapidly, poor focus might produce excessive discharge. Maintain finger discipline and keep the safety mode engaged when idle.
Use protective gear during intense simulations. Controlled testing environments minimize unnecessary risks. Responsible operation ensures longevity, efficiency, and user confidence during demanding sessions.
Advanced Tips for Serious Enthusiasts
Experiment with trigger shoe shapes to alter finger leverage. Curved shoes provide comfort, whereas flat shoes create more uniform contact. Small ergonomic changes significantly improve rapid-fire consistency and fatigue resistance.
Pair your WOT trigger 3 position with vibration dampening grips for enhanced stability. Reduced micro-shake means tighter grouping and cleaner target transitions. Frequent competitors value anything that decreases delay and control effort.
Conclusion
A WOT trigger 3 position raises control, speed, and precision dramatically when tuned correctly. Because its three stages adapt to any scenario, you decide when to prioritize accuracy or aggression. Install, maintain, and calibrate properly, then watch your performance elevate instantly.
FAQs
1. What does a WOT trigger 3 position do?
It provides three firing modes for safety, precision, and rapid engagement, allowing controlled performance in changing scenarios.
2. Is installation difficult?
No. Steady alignment, secure pin seating, and dry testing make installation smooth for most users.
3. Why choose a 3-stage trigger over a standard one?
Flexibility, faster response, and customizable pull weight make it superior for competitive or tactical use.
4. How often should I maintain it?
Clean and lubricate after heavy sessions. Regular care preserves smooth cycling and prevents wear.
5. Can sensitivity be adjusted?
Yes. Incremental adjustments help achieve a crisp break, light pull, and fast reset without sacrificing safety.